Showing posts with label Microscopy. Show all posts

Saturday, August 17, 2013

Sunflower Pollen as Paint Pigment

Sunflower Pollen - Pigment/Paint

Our house is still ramping up its dye-making capabilities.   The garden continues to grow enough that we can now harvest the Madder roots without depleting the patch (started in 2011 –link to post).  The basement will soon be a functional workshop, with plenty of lighting, a sink, electricity, and benches.   
 sun flowers for dyeing
Thanks to my wife’s gardening, we have plenty of sunflowers.  Some are of the Hopi variety, the seeds of which have been used by Native American Indians to prepare purplish/gray dyes.  Whereas I hope to make my own paints, she plans to dye fabric (DesignLab link)...so expect a post later on the seed-dye making.  Many flowers are brought into the house and drop pollen.

Given the nature of pollen to be colorful, tiny, and sticky, I started collecting it to use as pigment. First we had to replace the fabric tablecloth beneath the vase that was being “painted”; aluminum foil worked well since the pollen did not adhere to it, and it could be folded into a funnel  to deliver the pollen into a jar. 
sun flower pollen hopi

Sun Flower Pollen - Microstructure

To learn about how it may work as a pigment, let’s have a look at the pollen grains: (1) dry,  (2) in oil, and (3) in water.  Below, the pollen-in-air color image is a brightfield microscopy image; to show the detail, differential interference contrast microscopy (monochrome image) was performed. Most were a-spherical (“not spheres”) and ~10microns in width (that’s ~1/10 the length of a human hair). Clearly their spikes help them to stick to substrates.  The grains are a mixture from several sunflower plants.  Most were yellow, but some were purple.
Dry Sunflower Pollen

To make paint, pigments are dispersed into liquids.  These host liquids are usually water-like or oil-like.  Actually, microscopists often embed dry samples into liquids, to reduce scattering and improve imaging (this works if the samples do not react or transform in the liquid). These immersion tests reveal how these grains may be color-fast (or not). 
 sunflower pollen in oil
Turns out, the sunflowers lost their color in the oil; but their shell shapes did not change.  This means that the pollen is filled with a hydrophobic liquid (dye), and that the shells are porous.  Actually, the spherical grains seemed to leak less (I will have to investigate further if only certain sunflowers produce those). In water, the yellow dye was slowly replaced.  It was shot out of the shell as drops.  This confirms that the dye is hydrophobic, and that the shells are porous. 

This work will inform a paint recipe.  The observations are somewhat aggravating since they indicate it may be difficult to keep dye inside the grains whether a water-paint or oil-paint is made.  For now, I will keep collecting the pigment and will lean toward design an aqueous host phase. 


Tuesday, October 16, 2012

McCrone Group - Micrographia and Holiday Cards

This month (Oct 2012) I had the privilege of touring and speaking at the McCrone Group in Chicago (thanks to Chuck Zona and Kathy Cyr, Hooke College of Applied Sciences Dean and Director of Program Development respectively). Their educational/training branch is aptly named Hooke College in honor of Robert Hooke, the pioneer of mechanics (Hooke's Law) and the "Father of microscopy" (being the author of Micrographia, 1665) .

The visit was an exchange where I discussed "Microrheology of Formulated Consumer Products",  which shares a different perspective on microstructure since their expertise is largely focused on solid, dry particle analysis rather than wet mixtures (lotions, cosmetics, detergents).  Conversely, I was investigating how their services, training, and tools (i.e the McCrone Particle Atlas) could help P&G.

They are setting up a microscope museum and I was able to have a peak at a First Edition, 1665 printing of Micrographia (link is to the interactive online version) being stored in a vault until its case is ready. Don Brooks (CEO) graciously donned white gloves and opened it up for me...even unfolded the "flea" panel. Sweet. As a nerdy microscopist, this was exhilarating. Like looking into the lost ark :) ... but I didn't melt. 

The Group also shares a passion for creating Holiday Cards. Thanks to Christine Gorman (Admissions @ Hooke College) who tracked some of their historic cards down (see below).  I  will have to work microstructure / micrographs into my cards sometime, but not for 2012; this round I stuck to digital painting again.  Keep an eye our for it: this year's theme is faeries.    

All my cards can be found at S E Lindberg - Card Link.  I will again document the design process as I had for the 2011 cherub card.


Historic McCrone Group 

Season's Greetings Cards:

1973: Snowflakes?

Or... Polarized Light of Sodium Bicarbonate?


1988: Christmas Trees?

Or... Rheinburg Illumination of Ammonium Chloride in Water?


1993: Ornamented Pine Boughs?

Or... Fluorescein Crystals?


Sunday, October 16, 2011

Robert Hooke: a Microrheology Pioneer


I just attended the 83rd Annual Society of Rheology (SoR) in Cleveland, Ohio, and wanted to share some important links between Art/Science and Micro-rheology/Robert Hooke.


Rheology is "the study of the deformation or flow of matter" so SoR attracts a diverse bunch: device manufacturers designing diagnostic, medicinal widgets (blood flow); product and process engineers of paints, cosmetics, and foodstuffs; packaging designers concerned with manipulating molten plastic; petroleum engineers ruminating on extracting oil from the earth; and even biophysicists studying the mechanical properties of cytoplasm.   


The "Father of Microscopy" 
dreamed up the "Spring Constant"


Nerds are often self-deprecating and insecure, so it is refreshing that SoR's diverse participation welcomes people with multidisciplinary backgrounds (like me!).  Although I am a chemist by education, I have more experience performing microscopy and am embedded within a group of product/chemical engineers at work.   Since 2005, I could best be described as a "micro-rheologist" who studies the variation of mechanical properties within soft matter mixtures (more on microrheology below).


When your experience morphs you into being a master of the interdisciplinary, it is refreshing to find a single champion representing your apparently disparate fields of study (and hobbies).  Hence I was delighted to realize that the "father-of-microscopy" Robert Hooke (1635-1703) was the same who dreamed up "Hooke's Law" of elasticity (Hooke's law describes the elasticity of springs which is fundamental to rheology ... “As is the extension, so is the force”); but wait there is more... he was an artist too!  


Scientists were once artists

Of course, cameras did not exist in 1665, so early scientists had to draw their data! Leonardo Davinci's notebook is a classic documentation of this, but consider early anatomists who had to draw fast since their non-refrigerated corpses/subjects decomposed (for more on this, I recommend Kemp's beautiful book: Spectacular Bodies: The Art and Science of the Human Body).


Hooke pioneered the use of the microscope and presented his survey of microstructures to the Royal Society in his "Micrographia, or Some Physiological Descriptions of Minute Bodies made by Magnifying Glasses (click to browse the interactive book). Hooke had to draw his observations as he peered into strange, microscopic worlds.


Particle Tracking Microrheology - 
Hooke was a Microrheology Pioneer
Microscopes can be used as rheometers too!  To do this, one needs to be able to document the speed and location of colloidal bits (~1/100 the diameter of human hair) as they jiggle by Brownian motion (thermal fluctuations).  Difficult to do this by hand!

Note that Einstein was key in enabling the use of a microscope to measure one of Chemists' most famous number, the Avogadro constant, being the number of atoms per mole of material; well Einstein set the stage anyway, J.B. Perrin checked this experimentally with a microscope ~1900.

0.53micron particle tracking data from J.B. Perrin ~1913

A field of Particle Tracking Micro-rheology (PTM) has been emerging since the mid-1990's, fueled by the advent of the digital camera.  PTM Practioners will appreciate the often ignored Davidison and Collins' 1976 study of heterogeneous domains within Carbopol slurries in which they relied on Polaroid film and overlays of negatives to capture their data (J. A. Davidson and E. A. Collins, Journal of Colloid and Interface Science, 1976, 55, 163-169).

In complex fluids (from living cells to cosmetics) we are presented with a mixture of spring-like structures that are much smaller than the eye can detect.  Bulk methods can describe how they look to the eye (a camera) or how they flow as a composite (rheology), but to see measure the landscape of properties we need a microscope to see (a) the structure of the material that has a variety spring-like properties and (b) the rate at which free particles push against them.

PTM tutorials:
For an online tutorial of the nitty-gritty workflow I recommend MIT's website (some example images from there are highlighted below to illustrate how the motion of particles can be tracked); and for an example of how PTM can be used to measure soft matter mixtures I recommend Caggioni's paper "Rheology and microrheology of a microstructured fluid: The gellan gum case (link).


Saturday, June 4, 2011

Microscopists by day- Illustrators by night

UPDATE: 2013 - Robotslayer Paperback and iOS app have since become available!

Interview with fellow microscopist/illustrator, Vince Kamp

I begin with a call-out to the world-renowned microscope stage developers: Linkam Scientific.  Many industries require the ability to accurately perturb material or biological specimens with temperature, shear, tensile stress, exposure to radiation, humidity, etc.; and the Linkam crew enables viewing of microstructure via optical microscopy and many spectroscopic methods while doing so.  Rheologists and biologists alike adore their fine craftsmanship.  Linkam's products are available in the U.S. from many dealers including the McCrone Research Center (Walter McCrone was a famous "chemical microscopist" responsible for analyzing the pigments within the Shroud of Turin). Check out the Linkam online TV channel for more: 
LinkamTV
Turns out, although I have been interacting with Linkam since the late 90's, I did not know until recently that Operations Director Vince Kamp has been churning away on his own illustrated children's book. I was delighted to learn that he has a similar workflow: (1) sketch by hand onto paper, (2) scan, (3) color/texturize digitally.  His style is natural; it looks naturally painted with oil paints. So here goes my informal interview with him:


SEL: Vince, how do you construct your paintings? 
VK: As far as my process is concerned, well I sketch everything in pencil and then scan and import into PS.  I block in background colour and then block in my characters, I work from dark to light and use only one brush, a sort of splatter brush that mimics a traditional brush, set to 90% opacity and use pressure sensitivity on my tablet (wacom cintiq, 12") [SEL: Cripes!  I want one of those!].  I have messed around with water based colouring pencils and oil pastels but not for my online stuff.

Side bar:  This mixed media approach of (1) sketching, (2) scaning, (3) digitally coloring is getting popular. 
So here goes another call out to the friendly Brits.  They have an entire professional magazine dedicated to like artists; and it's rooted in fnatasy and sci-fi art.  Check out the ImagineFX website (their magazines are distributed in Barnes & Noble too).
ImagineFX Tutorial

SEL: You are too humble for words, and your sarcasm is thick...but delivery dry (especially via email).  Please clarify how you get your digital colors to look like real paint.
VK: I'm heavily influenced by traditional painting techniques and though I'm completely untrained and don't know what I'm doing [SEL: UK humor?], the books I study almost exclusively focus on light and colour in oil painting.  So I guess I'm saying my pics may not look so digital because I try to paint in a traditional way of using layers of paint and blending.  I almost never use all the various tweaking filters in PS as I would love to one day have the time to paint properly on canvas. I don't want to rely on digital tools to get the look I want.  If I ever get round to being able to create a beautiful oil painting I think I would feel like I could really exploit everything in PS to produce much better pictures, but I would like to earn that right by studying all the fundamentals first.  Understanding colour and light is just so fascinating and I don't believe I've even scratched the surface, it's insanely frustrating.

SEL: Your style is perfect for a kid's book, I can't wait to see how Leo the Robot Slayer emerges.  Does any work inspire this style? 
VK: Even though my pics are all cartooney I love Vermeer and Rembrandt and many of the more obscure post renaissance painters from in and around my Dad's village in Holland.  I know I'm waffling but I thought I would give you an idea of how I think when I'm colouring my pics as the process itself is really very simple.  One brush, 90% opacity.  If you haven't already, check out James Gurney's light and color http://www.amazon.co.uk/Color-Light-Guide-Realist-Painter/dp/0740797719. By the way, the comment that my pictures don't look digital is probably the greatest compliment I have received so far, as that is ultimately what I'm desperately trying to achieve.


Friday, May 6, 2011

Images Have Skeletons Too

 Scientific Image Analysis 
can be a great tool to learn about composition
Key Points:
  1. Images have real backbones ("structure" or "composition")
  2. Viewers eyes gravitate toward edge detection; as an artisit, you must use composition to lead your viewer through your landscape
  3. It is fun, although excessive, to reveal composition with scientific algorithms.

Art Analysis

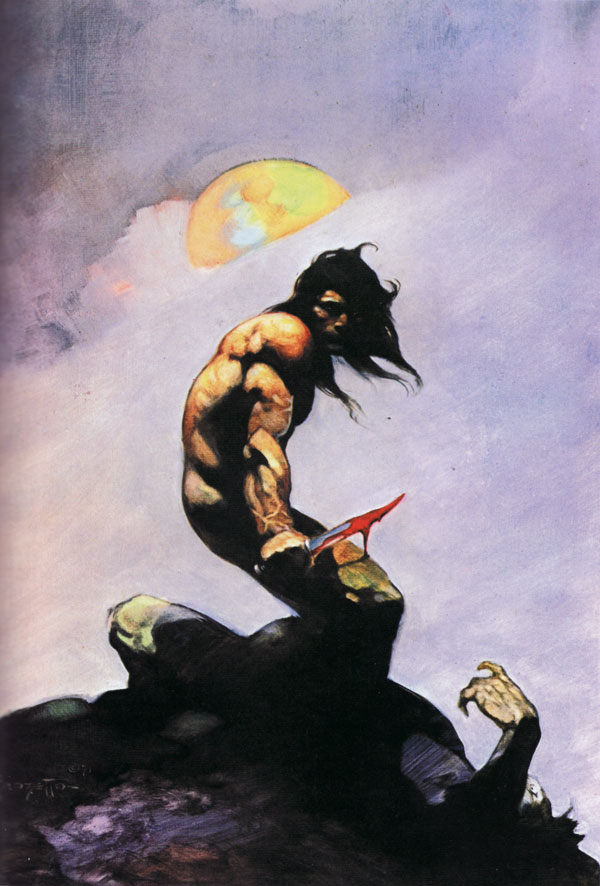
Frazetta's Tanar
An inspirational side bar: I stumbled across a cool blog @ Ideas Made of Light that dissects the composition of fantasy art (and others), including Frazetta's "Tanar of Pellucidar", M.C. Escher's "Relativity", and Dali's "Gala Contemplating...Abraham Lincoln".

This is a fantastic website for lovers of Art & Science, since it comprehensively reveals compositional design concepts with easy-to-understand visuals.  If you want to understand art better, or be a more deliberate designer, check these case studies out ... then apply what you learn.


Russ's Image Analysis Book
Image Analysis

I am a huge fan of John Russ, a retired North Carolina State Professor and image analysis/metallurgist expert.  The analysis methods he often applied to solid state matter are also used to quantify microstructures within soft matter mixtures (i.e. paints and consumer products like cosmetics, toothpaste, and conditioners :) ).  His Image Analysis Processing handbook-6th edition is just being released.  Image Analysis can also be used to analyze Sword & Sorcery cover art to reveal compositional design!  Woo-hoo! 


Shape Analysis of Positive / Negative Space

Let's apply some John Russ's image analysis (employable via the Photoshop interface as "filters") to reveal the composition within the proposed my Lords of Dyscrasia cover art.  I shared a draft of this entry to John and his son Chris (who leads Reindeer Graphics and collaborates with his father authoring books and code), and they rightly clarify that, in artistic terms, the below procedure "is a shape analysis of positive or negative space."

Here is what we'll get:

(1) a skeleton of features within the primary focus, the "Intensity Skeleton"
and (2) a demarcation of the primary "Contrast Interfaces" that lead the viewer's eyes about the image


To do this, we'll apply a series of operations to our color image.
1) First, we'll isolate the intensity levels by transforming the RGB (red, green, blue) image into HSI (hue, saturation, intensity) map; we'll disregard the hue and saturation for this work and focus on the intensity.
2) Next, we'll apply a median filter to remove the high frequency details since we aim to look at the gross composition (a Gaussian blur).
3) Thirdly, we'll transform the grayscale image (256 gray levels) into a binary image (2 levels, black and white) by common thresholding (we choose a critical gray level that turns all lower to black and all higher to white).
4) Finally, we'll fill-in-holes via a morphology filter.
This prework enables us to derive our skeletons. To mark out the features within the primary focus (figures and fire), we...
5) Recolor our binarized image with a Euclidean Distance Map.  This will re-shade all black regions with a new intensity dependent on the proximity to the white area. This effectively will make a landscape in which the peaks (the skeleton) can be isolated
6) To isolate the backbones, we threshold our distance map and select values that contain only the peaks.
7) To visualize the backbone of this internal structure within the focus area, we overlay the skeleton atop a version of the original.


Okay, we are also interested in contrast (contrast mechanisms differentiate the many imaging modes used in microscopy). In common terms we are looking for the edges, or interfaces, between key regions.   
5b) We'll still need our distance map.  We'll go back to image 4 and take a different path. 
6b) This time we'll isolate the edges by thresholding and coloring the opposite peaks (in this case the lightest shades of grey).
7b) We'll overlay them atop a version of the original
8b) And compare these heavy-duty mathematically derived drawings to a simple free-hand estimate (an ellipse).

Hopefully this supports the design I worked in up-front.   The idea was to draw the viewer's eye toward the skeletal hero (the undead, anti-hero Endenken Lysis).


Saturday, March 5, 2011

Creepy Microscopy: Animated Myelins and Tentacle Stick Figures

Always on the lookout for spooky textures detected with a microscope or revealed in my kids' drawings, I have been enthralled and terrified to watch soap dissolve.  To be scared like me, you'll need to read lots of Lovecraftian horror stories...then use a microscope to monitor soap hydration.  Obviously, there are limited folks who'll fit that call to order, so below may suffice:

Polarized Light Microscopy (PLM) is really cool method that reveals ordered structures within microstructures like nylon fibers, mineral grains, and wet soap. [For gearheads wanting to learn more, check out the interactive (Flash and Java) Tutorials at Florida State's Microscopy University and the separate primer on using PLM to study cystals: Birefringent Crystals].


Ref-1 Hydrating Soap

Fran Rosevear (1912-2010) was a Procter & Gamble phase chemist and microscopist who authored seminal papers of PLM for characterizing surfactants (soap) as they hydrate (get wet).  The tentacle like structures in the "Neat" phase are bilayer tubes (see images).  If you watch water enter dry soap, you can witness these structures form; Rosevear called the analogous, equilibrated structure "oily streaks".


Myelins are flexible crystals, laminated tubes of the same oily streak structure described by Rosevear.  Watching them be born is a real hoot.  They emerge like wiggling snakes as water works it's way into concetrated surfactant.
Ref-2 Oily Streaks

Here are some myelins I witnessed form using Differential Interferrence Contrast  microscopy (a form of PLM).  Do these not scream "Lovecraft dreamed me into existence"?  The myelins look like swelling brain matter.  If I did not know better, I might claim they were sentient worms instead. 


Mike Cates of the University of Edinburgh and collaborators have been studying myelin formation and have some more compelling images.  This image was shared by Louisa Reissig's presentation: Myelin Formation during the Dissolution of Lamellar Phase @ the 81st ACS Colloid & Surface Science Symposium (June 24-27, 2007), Newark, DE.

Here is another image from literature, this one from nonionic systems (BH Chen, C. M., JM Walsh, PB Warren (2000 ). "Dissolution rates of pure nonionic surfactants." Langmuir.)


Okay, so I worked visions of evil tentacles into the Lords of Dyscrasia Book trailer (another post). This is the second video featured in the trailer:

These structures (and the horrors they evoke) are also affecting my creature design for my sequel to Lords of Dyscrasia.  Below, I share imagery my son drew up for me:
  
Connor's tentacled monsters - (created ~2010)  


Yes, I have been known to ask my kids to contribute to the creative process.  For completeness sake, I share some my daughter dreamed up a few years ago: 

Erin's "Blood Skeletons" (created ~2003)